Thursday, April 11, 2013

Scratching my "Fixit Itch" with a Washing machine issue

Potential problems for a problematic Maytag washing machine were researched on the internet prior to dealing with drainage problems for a Maytag MAH2400aww. One post alluded to a faulty design as a reason for the particular problem with this model, which is what is being dealt with in this blog.

The main issue was that the machine was not draining resulting in stagnant drainage water. So after emptying this water, the machine was hoisted about a foot and the remaining water in the drain hose was emptied as well into a bucket placed below the level of the bottom of the machine.


Then the machine was replaced on the floor and tilted back with the front end elevated to allow access to the pump on the front right bottom corner.


Inlet connection (horizontal) and outlet connection (vertical with black O ring)

The bottom panel was partially removed providing exposure to the drain pump with both connection hoses. The hose that connects the tumbler to the pump via the inlet connection on the pump was removed with a bucket placed below to catch any residual water. In addition to water, this is what was in the bucket as well.


75 cents - Yup - three quarters fell out of the hose into the bucket. So here I am all happy that this must be the problem --- Solved !!!.  So the entire machine was reassembled and a trial run was attempted without success. Surely, with thoughts in my mind, if  the problem was  3 quarters, then why was the machine still not working after its removal? So I though for a minute, and decided to take down the pump itself completely. It was secured to the body of the machine with 4 screws, and therefore was easily removed.


What was found in the inlet connection was another quarter staring me in my face as if to say "Damn you found me". So I tried to remove it without success, and therefore was forced to open up the pump. This is what I found.


Mr. Quarter and his twin "Bob" (If you're a Trini you would get this) were both stuck in the inlet chamber of the pump and basically jammed

the rotating 3-finned blade preventing the pump from functioning at all. So round two - Surely, alas this has to be the problem. There weren't any coins in the outlet connection hose, so the hope was that with reassembly, everything should work just fine.  ----->>>>>>   AND IT DID!!!!!!

I was happy, the owner was happy, the referral person was happy, and I guess everybody who the owner told was happy also, I guess.

What was interesting from the online internet search about this problem was that one post said that the person who designed the washing machine should be fired and should loose his/her license because - they did not insert a pump filter to prevent large objects like coins or buttons from going into the pump and jamming it. Well this is precisely what happened in this particular case.

At the end of the day, it indeed was a learning experience, and I was glad to have the opportunity to scratch my fixit itch once again. :)
Peace out!!!!

Sunday, March 3, 2013

Open USB Surgery

 Well It worked great for a while until the inevitable happened. My USB cellphone charger (like the one shown below) stopped charging unless held in a certain position, then eventually a message about "not enough charge" appeared. So about 5 hours after getting  a replacement on ebay for 3 bucks, I decided to perform open USB surgery on an obvious short in the cable. (Uhhhh just for fun)

Standard USB end on the left inserts to the plug. Micro USB end on the right inserts into the cellphone.

 Of course prior to any procedure one has to do a bit of research and a physical. Usually short problems occur at junctions where the wire attaches to the micro USB end or the standard USB end (as was the case here). The wire is comprised of 4 colored wires (red, white, green and black as indicated below) surrounded by a wire-mesh shield. For charging purposes, only two of the wires are really needed, red (+5V) and black (ground). So the assumption was that either one  or both of these two wires would have been the location of the short.


 As most surgeons would do, I fired up some Chopin, and started to cut away a portion of the hard black plastic casing of the standard USB end to gain exposure to the obvious short site. The wire-mesh shield was found to be broken at the site and was 'dissected' away to expose the 4 colored wires. The green, black, and white wires appeared fine, but the plastic sheet covering the red wire at this junction seemed a bit flimsy. A small strip of cardboard was placed to isolate the red (+5V) wire.


Then a small segment of red plastic was stripped to expose the bare wire. 


The short was identified as indicated below


The wire was cut at the area of the break, the plastic ends were stripped back, and the wire ends were reconnected with flux / solder.


Electrical tape was used to cover the exposed wire. The wire-mesh shield was then reconstructed with additional wire and reconnected with solder.


Electrical tape was then used to surround the entire reconstruction, and a wooden 'splint' of adequate length was measured and applied to the construct as shown below.


So the purpose of the wooden splint is to minimize the about of bending that would normally occur in the wire at the USB end.


When put to the test, it worked. Hip hip hooray, That was fun :). Guess it's always good to have an extra charger around.

Wednesday, November 28, 2012

Subtraction of Powers and Other Observations

Exponent = 2
n=    1            2              3                4                5                 6               7              8              9              10
n^2=1            4              9               16               25              36             49            64            81            100
S1          3             5               7                9                11              13             15            17             19
S2                 2              2                 2                2                 2                2             2             2


Exponent = 3
n=    1            2              3                4                5                  6               7              8             9              10
n^3=1            8             27             64              125             216             343
S1          7             19             37             61                91             127
S2                 12            18             24               30                36
S3                          6               6               6                  6           

Exponent = 4
n=     1            2              3                4               5                6               7              8               9              10
n^4= 1            16           81              256          625           1296          2401       4096        6561       10000
S1            15           65           175             369          671           1105         1695                    
S2                    50           110           194          302            434           590
S3                            60            84             108          132            156
S4                                    24             24            24              24


Exponent=5
n=     1             2               3              4               5               6              7               8               9              10
n^5= 1            32             243        1024         3125        7776         16807
S1           31             211         781         2101         4651        9031
S2                    180          570         1320        2550        4380
S3                             390         750        1230         1830
S4                                     360         480         600
S5                                             120        120

Based on observations and a few other deductions, we can predict a similar senario for Exponent=6 or any other exponent for that matter.

Obs1: Recurring subtraction numbers in the are always in the corresponding S level for the exponent.

Obs2: The recurrent number is always the Exponent factorial. Exp=3, S3= 3!=3x2x1 or Exp=4, S4=4!=4x3x2x1

Obs3: the first number in the penultimate S level is always Exp!/2x(Exp+1)
    Ex: for Exp=4 the first number in S3 is 24/2 x (4+1) = 60  and for Exp=5, the first number in S4 is   120/2 x (5+1)=360
                 
Obs4: for Exp=5, the last number of each power is in series,because of that, all S1 numbers end in "1" and the remaining numbers in the remaining S levels are multiples of 10

Future observations pending..........

New Date: Dec 25th, 2012 :

For future reference, the level above S1 shall be termed the Power level or P level and the Exponent shall be represented by the letter "e" instead of "Exp".

  An attempt was made to represent all S level numbers in e=3 power subtraction series in terms of  e+1, e, e-1, e-2 etc.

Obs 5: what was definite was that the largest term in the S1 level needed to create the first recurring subtraction term in the Se level was the eth term in S1 and therefore required the (e+1)th term in the P level. So in the case of e=3, the first 6 in S3 exists because of the 3rd term "37" in S1 and the 4th term "64" in the P level.
Obs 6: From the highest to lowest terms, all S1 level terms had coefficients of        1 &-1
Obs 7: From the highest to lowest terms, all S2 level terms had coefficients of     1 , -2 , 1 (in red)
Obs 8: From the highest to lowest terms, all S3 level terms had coefficients of 1 , -3 , +3, -1 (in red)


Same thing was done for e=4.

Obs 9:  Obs 6,7,& 8 for S1, S2, and S3 respectively applied in this scenario as well.
Obs 10: From highest to lowest terms, all S4 terms had coefficients 1 , -4 , +6 , -4, & +1


Obs 11: Based on a possible pattern, the coefficients were structured in the form of a pyramid
                                                        1      -1
                                                    1     -2     +1
                                                1     -3    +3    -1
                                            1     -4    +6    -4    +1
Obs12: e=5 coefficients predicted by adding the 2 absolute values above and alternating signs starting with +
                                       1     -5   +10   -10   +5     -1
Obs 13: The math was added up (in red) and was = 120 --> same as 5! = 5x4x3x2x1 = 120

Obs 14: e=6 coefficients predicted.
                               1       -6    +15  -20   +15    -6       +1 
 Obs 15: The math added up (in red) = 720 same as 6!
Obs 16: The terms in the Se level can be predicted based on the terms in the P level using the coefficients in the pyramid (I'll call this the Coefficient pyramid) eg: the recurring term in S6 for e=6 can be determined by placing the corresponding coefficients with the P level terms from highest to lowest starting with the 7th ('e+1'th) term, then 6th, 5th, 4th, 3rd, 2nd, and 1st terms, then adding them up. [ or you can just do e!]
Future observations pending....................

Thursday, November 8, 2012

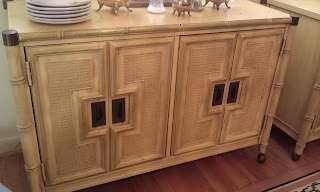
Jammed Doors, Warped Cabinet, and Skanky Legs

So the main complaint was that both cabinet doors were jammed. Unfortunately, I did not have pictures prior to solving the problem, so to the left is an exaggerated schematic of the front of the cabinet. Upon inspection, the left door was jamming at corner A and the right door was jammed at corner B.
At first glance, the cabinet surface seemed flat and the center doorjam strip in yellow was slightly slanted to the left kinda like a backslash ( \ ). All four legs and metal caster wheels seemed level with the floor.
Upon closer inspection, what was noticed was that the entire cabinet was a little shaky so i checked and tightened all the corners braces that would have kept the entire structure square. But that still did not solve the problem. Shaving the jammed areas A and B also did not solve the inital problem.
But at long last a eureka moment occurred when I squeezed both sides of the cabined and noticed that both doors suddenly became unjammed and were able to open and close freely. Not only that, I noticed that the central door jam became vertical, corners A and B were no longer touching the top and bottom of the cabinet and that both doors were aligned with each other horizontally and vertically, and that the front right castor wheel was no longer touching the floor.

This picture shows what the right castor wheel looks like. It was well seated into the wooden front right leg. At first I thought that maybe that leg needed to be lengthened or placed on a block because if I lifted the front right leg alone, the entire cabinet structure would become square as if I had squeezed both sides to correct the original problem. Then I glanced at the other 3 legs and noticed that the front left castor wheel [C] was not seated completely into the wooden leg, offset about 1/4 in.
Could this have been the original problem all this while? A single unseated castor wheel causing warped cabinet instability resulting in jammed doors? So after exerting pressure on the cabinet to seat the castor completely into the front left leg, both doors were able to open and close freely without jamming.
 
PROBLEM SOLVED

Friday, August 26, 2011

Krazy repair of an armrest

Broken armrest for the driver side of a Regency Brougham

Prosthetic wooden plates (I guess)

Wooden plates in place to replace missing plastic

A whole heap of Krazy Glue

Reconstruction in progress

More reconstruction with Krazy Glue

Looking good

Done deal -  Honestly, I was trying to avoid a trip to the junk yard

Saturday, April 16, 2011

Unusual Trunk Location for a Leaky Situation

Well I think I finally solved a problem that totally bewildered me for the past six months. In hindsight, I guess I could have done what I did today six months ago and the bewilderment would not have lasted that long. Every time it rained, there would be a puddle of water in my trunk, and I figured that it could not have come from around the edge of the trunk because the rubber strip lining the edge was intact. So today, I decided to empty the trunk and await the rainy forecast.

 
Sure nuff, the puddle of water reappeared. But from where was the million dollar question.  
 What I noticed was a trickle of water running down from the inside of the trunk just above the left tail light. When I checked the outside, there was really nothing overtly noticible. But when I checked the trickle of water (during the rain with my trusty umbrella in hand) it seemed to be coming from NOWHERE. Upon futher inspection, there was a channel of water that would drain from the rear windscreen into a pathway behind the trunk edge, then down the left side of the trunk edge and then down to the right side of the left tail light. Here's the kicker - there was an unwelded seam just above the tail light  through which water was entering, hence the souce for the trickle of water inside the trunk. - Water (I mean 'what a') kicker.


 I shined a light on the inside, and again quite unnoticible, the  corner was not covered with tan sealant and also one could see the light glow from the outside.


The corresponding seam on the right side of the trunk was welded.


So I did the next best thing to welding. Out came the caulk gun and the elusive hole was sealed. I must say that this is an extremely unusual location for a hole through which water can enter the trunk during a rainfall. So alas, let us await the next predicted April shower for some success and an end to the bewilderment of this leaky situation. :)


PS: the tiny crack in the seam line (shown below) was cause for major puddles in the rear floor behind the driver seat. Caulk to the rescue!!!


Tuesday, April 5, 2011

Substitute Influence?

Question: Why are you here?
Answer: Because there is no substitute for my presence as a positive influence on others.